")
So, you’ve completed your tiling project, and it looks fantastic. But now you need to drill into that pristine surface to install a towel rail, shelf, or bathroom accessory. Drilling into tiles can feel daunting, especially if you’re worried about cracks or costly mistakes. But, with the right tools and techniques, you can drill holes in tiles cleanly and safely. In this expert guide, we’ll walk you through everything you need to know, from understanding tile types to choosing the right drill bit and preventing cracks.
1. Know What You’re Drilling: Tile Type Matters
Before you even switch on the drill, it’s crucial to identify what type of tile you’re working with — because not all tiles behave the same when drilled. Understanding your tile material will help you choose the right drill bit, apply the correct pressure, and avoid unsightly cracks.
- Ceramic tiles are the most common and relatively easy to drill through. They’re softer and less dense, which means a carbide-tipped drill bit will usually do the job.
- Porcelain tiles, on the other hand, are much harder and denser. They require a diamond-tipped drill bit to effectively cut through their tough surface. Drilling too aggressively without the right bit can cause the tile to crack or chip.
- Natural stone tiles (such as slate, marble, or granite) are beautiful but unpredictable. Each type of stone has its own hardness and brittleness, so specialised diamond-tipped drill bits are recommended, often with water cooling to reduce friction and heat.
If you’re unsure of the tile material, consult your installer or try gently scoring an offcut with a utility blade. porcelain resists scratches, while ceramic marks easily.
2. Gather the Right Tools and Safety Gear
Drilling through tiles is a precision job — and that starts with having the right tools and protective gear on hand. Skimping here can result in broken tiles, injured hands, or a drill bit that burns out halfway through the job.
Essential Tools:
- Electric drill: A standard drill works fine. just ensure the hammer or percussion function is switched off. Impact drills can crack tiles.
- Carbide-tipped drill bit: Best for ceramic tiles.
- Diamond-tipped drill bit: Essential for porcelain and stone tiles.
- Masonry drill bit: Used once you’ve drilled through the tile and hit the substrate behind.
Safety Equipment:
- Safety goggles: Protects your eyes from ceramic or porcelain shards.
- Dust mask: Prevents inhalation of tile dust, especially important with older tiles that may contain silica.
- Protective gloves: Gives better grip and protects your hands from slipping or cuts.
Additional Helpful Items:
- Masking tape: Helps reduce slipping and chipping on the surface.
- Water spray bottle or damp sponge: Prevents overheating.
- Spirit level: Ensures fittings are aligned.
- Drill guide or wooden jig: Increases drilling accuracy, especially for multiple holes.
-
3. Mark and Measure with Precision
 One of the most common causes of cracked tiles or crooked accessories is inaccurate drilling. That’s why careful planning, measuring, and marking are essential before any drilling begins. Start by using a tape measure or laser level to determine exactly where the holes are needed. Double-check all measurements even a few millimetres out can make a shelf or towel rail visibly slanted. For multiple holes, especially where alignment is key (such as installing a shelf or rail), use a spirit level to ensure everything lines up perfectly.
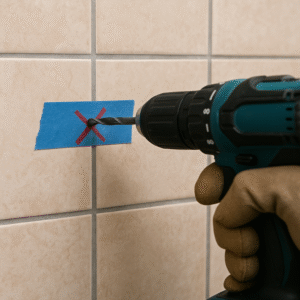
Once measured, mark the tile using a non-permanent pencil, wax crayon, or fine-tip marker. Then, apply a strip of masking tape or painters’ tape over the area. This serves two purposes: it provides a rougher surface for the drill bit to grip, and it helps reduce chipping when the drill breaks through the glaze.
For more precision, especially when drilling multiple identical holes, consider using a wooden drilling template. Simply drill a guide hole in a small piece of wood and hold it firmly over the marked spot. Alternatively, invest in a commercial drill guide with suction cup for hands-free accuracy.
Careful preparation at this stage ensures professional-looking results and prevents costly mistakes.
4. Drill Slowly and Steadily Through the Tile
 Now that your tile is marked and prepped, it’s time to drill, but this isn’t a job to rush. Tiles are brittle and unforgiving, and applying too much speed or pressure can cause cracks, chips, or even full breakages. Instead, go slow, stay steady, and follow these steps:
- Begin by positioning your drill at a slight angle to the tile, this gives the bit some traction and helps prevent it slipping across the smooth surface. Once you’ve established a small indentation, slowly straighten the drill so it’s perpendicular (90°) to the tile.
- Set your drill to low speed with no hammer action. Use light, even pressure and let the drill do the work. As the bit penetrates the tile glaze, you’ll feel a slight change in resistance, that’s your cue to keep going steadily until you pass through the tile’s body.
- For very hard materials like porcelain or stone, you may need to pause occasionally to cool the bit with water or a damp sponge. This also helps capture dust and reduce friction.
-
5. Keep Your Drill Bit Cool to Prevent Cracks
 One of the most overlooked aspects of drilling through tiles is temperature control. As you drill, friction builds, especially on dense materials such as porcelain or natural stone, and this generates heat. If the drill bit gets too hot, it can scorch the tile surface, dull the bit, or cause microfractures that weaken the tile and lead to cracking.
To avoid this, you need to keep the drill bit cool throughout the process. The easiest and most accessible method is to keep a damp sponge or cloth nearby and use it to dab the drill bit at intervals. For greater control, some DIYers hold a wet sponge just beneath the drill point this helps cool the bit and also collects dust, reducing cleanup.
If you want to achieve even better performance, especially when using diamond core bits (up to 12mm), we recommend using a dedicated cooling product like the Montolit Mondrillo Performer Cooling Gel. Simply switch off the drill and dip the core bit into the gel for a few seconds. This helps prolong the bit’s life, improves cutting speed, and prevents overheating, making it ideal for harder tile materials like porcelain or vitrified stone.
Just be cautious when using water or gel near corded drills — always keep liquids away from the motor or battery housing.
For professionals, there are specialist tools available like water-fed drill cooling systems, which automatically cool the drill bit while in use. These are especially useful with diamond-tipped bits, which maintain performance longer when kept at a low temperature.
6. Switch Drill Bits When You Reach the Wall Behind
Drilling through the tile is only the first step, you’ll often need to drill deeper into the wall behind to securely mount whatever fitting you’re installing. Once you’ve passed through the tile body, stop and switch to a suitable drill bit for the substrate beneath. This is because diamond and tile bits are designed for surface-level penetration. Continuing to use them on masonry or timber will wear them out quickly and reduce performance.
Here’s how to match the bit to the material:
- Masonry wall (brick, block, concrete): Switch to a masonry drill bit. These have a hardened tip and can handle dense materials with ease.
- Timber or plasterboard: Use a wood drill bit, which will cut more cleanly through soft materials.
- Cement or tile backer boards: A standard masonry or wood bit may be used, depending on density.
- Metal studs or pipes (if unavoidable): Opt for a high-speed steel (HSS) bit or cobalt bit for stronger metals.
Drill carefully and slowly through the remaining depth to match the length of your wall plug. Don’t forget to remove dust from the hole before inserting fixings — this ensures a firm, secure fit for your screws or anchors.
7. Insert Fixings and Finish Up
Once the drilling is complete, it’s time to install your fixings, but even this stage needs care to avoid damaging the tile or weakening the hold.
First, use a vacuum cleaner nozzle or a soft brush to remove any residual dust from the hole. This ensures your wall plugs (rawl plugs) will grip properly and not slip over time. You can also use a cotton bud or compressed air to clear finer particles inside the hole.
Next, insert the correct size wall plug based on your screw diameter and the weight of what you’re mounting. The plug should fit snugly, not loose or tight enough to crack the tile. Tap it in gently with a rubber mallet if needed, taking care not to chip the tile edge.
Now you’re ready to screw in your fitting. Use manual control or a slow drill setting to prevent overtightening, which could twist and crack the tile surface. Finally, wipe the area clean with a damp microfiber cloth to remove any pencil marks, masking tape residue, or dust.
Professional Tiling Tools from Quantum
At Quantum Group, we don’t just offer expert advice, we supply the professional-grade tools and accessories that help tilers and tradespeople get the job done right, every time.
Whether you’re a DIY enthusiast or a trade professional, using high-quality tools is essential for drilling through tiles cleanly and efficiently. That’s why we proudly stock our Tylix range of tiling tools — designed for durability, comfort, and precision. For tile drilling in particular, our Spirex drill bits are engineered for performance. Available in multiple diameters, Spirex bits are ideal for ceramic, porcelain, and stone tiles, offering excellent penetration, reduced vibration, and extended bit life when used correctly with cooling methods such as the Montolit Mondrillo Gel.
With next-day delivery available across the UK and Ireland, competitive trade pricing, and a dedicated support team, Quantum is your trusted partner in professional tiling solutions.
Interested in stocking Quantum products?
Looking for a reliable supply of Tylix tools and Spirex drill bits?
Contact us today or visit our website to find your nearest distributor.